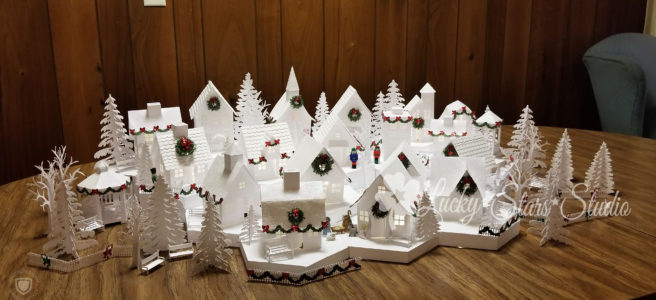
Last year I made a pretty, white Tea Light Christmas village for my mom. She loved it. But it turned out much bigger than either of us expected–so there’s some question where she’s actually going to display it. 😂
The simple elegance of the white cardstock make the touches of green and red pop. I love it.
How I Made It
I cut the houses using my trusty Silhouette Cameo. The houses are available on the Silhouette Design Store by artist Marji Roy. The designs are also available on her website in other formats if you don’t have a Silhouette. The village tutorials are here. They were pretty easy to put together–but the most time-consuming parts were adding the scallops to some of the roofs. The houses are about 4 inches square, and the hexagons are about 6 inches in diameter. As I said before, the project got bigger than I expected. No one that knows me is surprised. ha.
For the windows, I used vellum to give them a frosted glass effect. It hides the view of the light strand but lets the light shine through. For the Church, I gave the vellum windows a watercolor effect so it looks like stained glass.
The village includes:
- 20 buildings,
- a plethora of snow-covered trees,
- a covered bridge,
- fences and park benches,
- gazebos,
- a couple of moose,
- a horse-drawn sleigh,
- a TARDIS (haaa),
- a little nativity scene (I cut off the button loops),
- little nutcracker soldiers (also cut off the button loops),
- and an ice skating rink.
I used white glitter on the roofs and the edges of the trees to look like fresh snow. The bows have red glitter added to them. I realized after that using red glitter cardstock would have been better. Adding red glitter to the bows after they were cut was messy!
The hexagon bases, also from the Artist’s website, are a great way to hide the lights and add dimension to the village. I used the tutorial on her website to set up the village. There’s a hole in each base that allows the strand of lights to be threaded up and into each house. Because I used bendable fairy lights, it was easy to feed the lights into each house.
Supplies used:
- Silhouette Cameo
- Silhouette Design Studio, Business Edition
- Silhouette Design Store shapes
- Silhouette Pen Holder
- Paper:
- Bazzill “Smoothie” Cardstock in Coconut Swirl
- Some of the roofs are made with a dot embossed cardstock (Bazzill Dotted Swiss in Salt, but it’s discontinued)
- Vellum Paper (for the windows)
- Scrap red cardstock for red bows
- Scrap green cardstock for green garlands
- Adhesive: Scotch ATG (looove it!), and Elmer’s School Glue in Clear
- Liquid glue needle applicator bottle
- Mod Podge and Sponge Brushes to apply Mod Podge to the trees and roofs
- Fiskers 12″ Rotary Paper Trimmer
- Fairy Lights Strand
- Mini Wreaths: Pine Stems
- Red Glitter for bows
- White glitter for snow effect on roofs and trees
- Nativity Scene buttons
- Nutcracker buttons (I found them at Hobby Lobby)
- Candy Cane stickers for the fences
This was such a fun project to work on! I’m just enamored by this little (or not so little) white Christmas village. I’m tempted to make a slightly smaller version for myself, but I still remember my hand cramping from all that gluing. 😂


Wow! I love Christmas villages, and I understand about them ending up bigger than expected. This is so exquisite!
Maybe when we get home, I can make one, too.
Thank you! You probably don’t have enough room right now for one 😉 and I love hearing about all your adventures so via email! 🙂