The Juniper Tree

Photo of a twisted tree trunk

I have an affinity for weird-looking plants and animals. Moose? I love their big, fat noses and crazy antlers (although they’re also terrifying when you see one close-up!). Penguins, their amusing waddling. Walruses: their hysterical mustaches, although, again, terrifying up close. hahaha.

And there are so many amazing, weird plants out there.

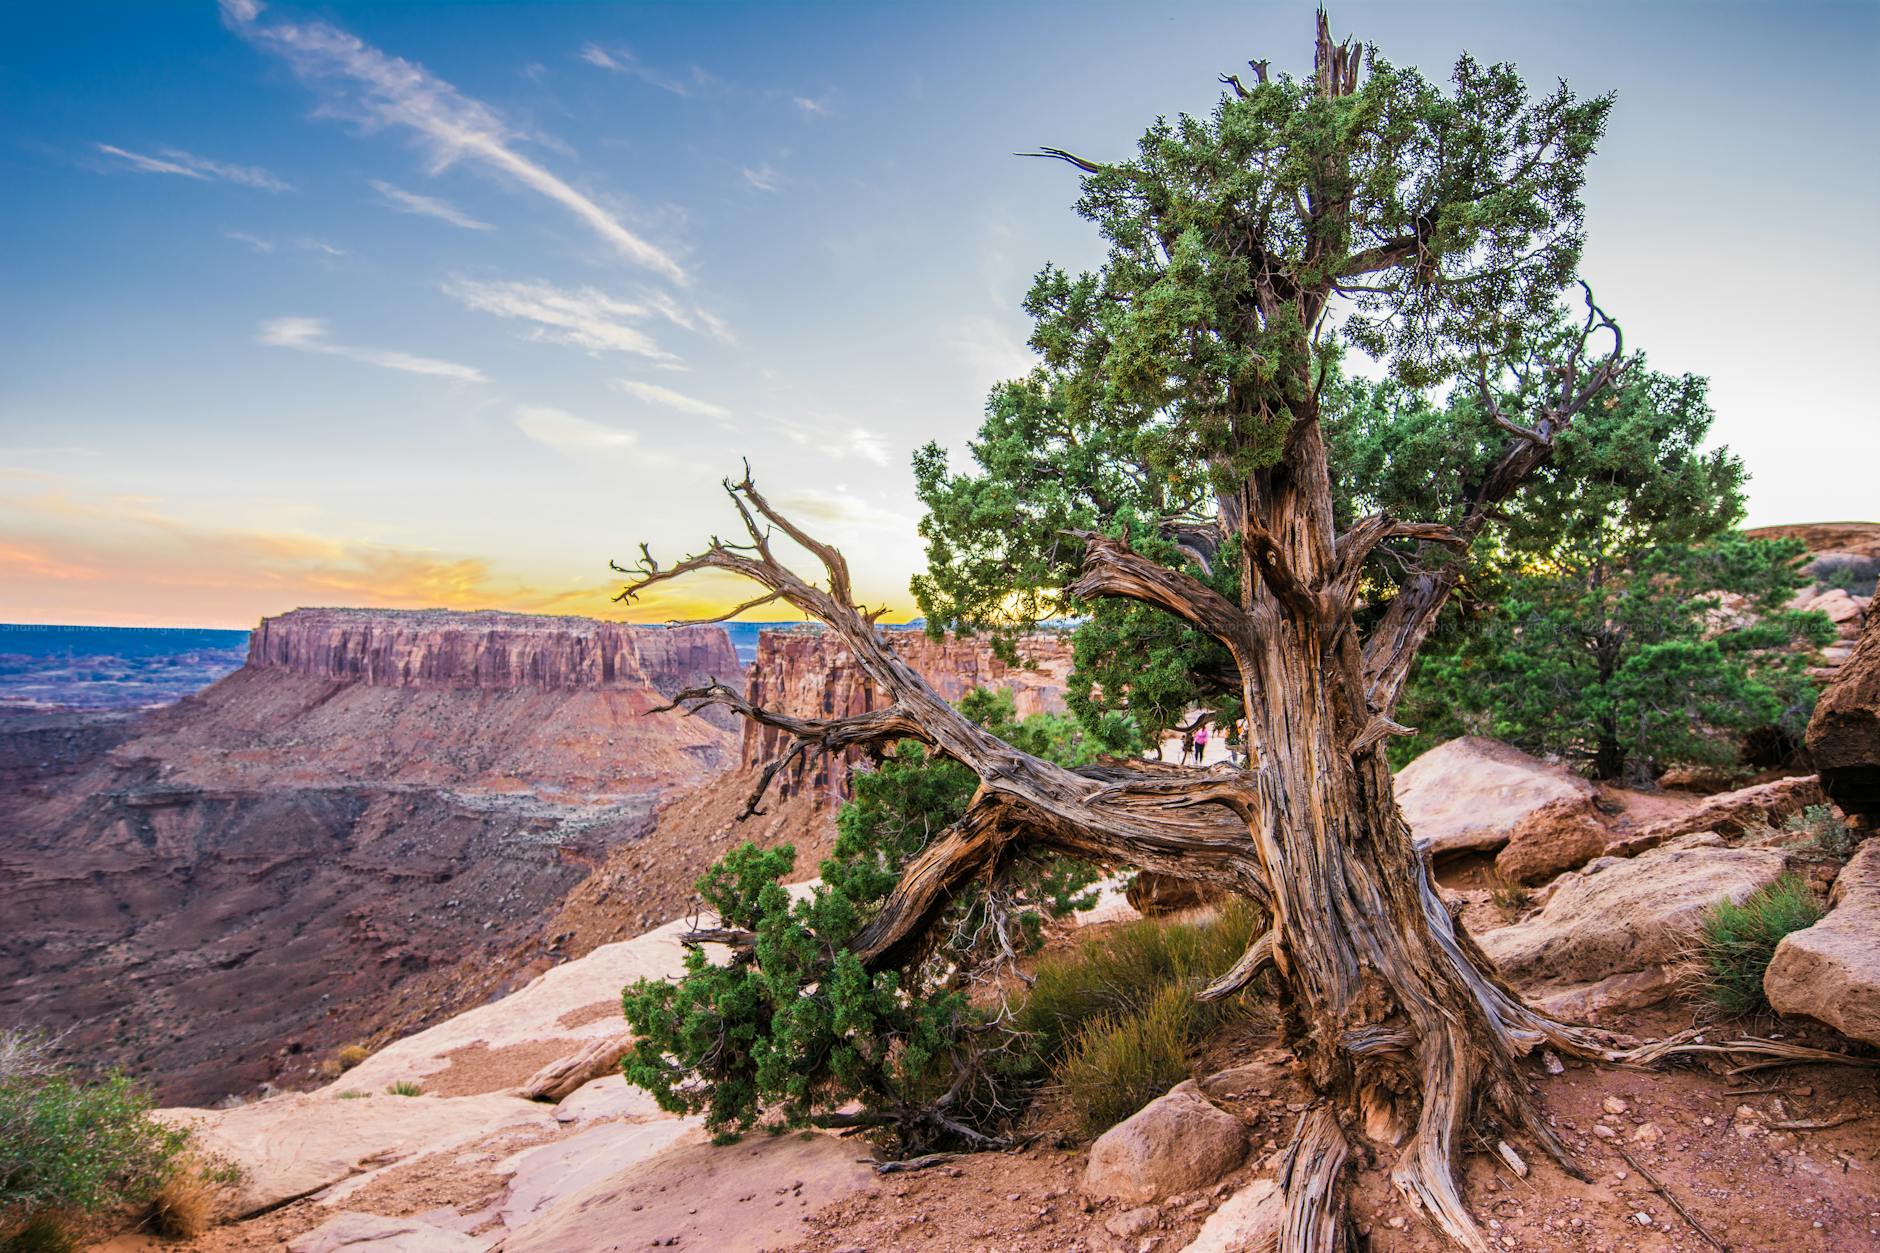
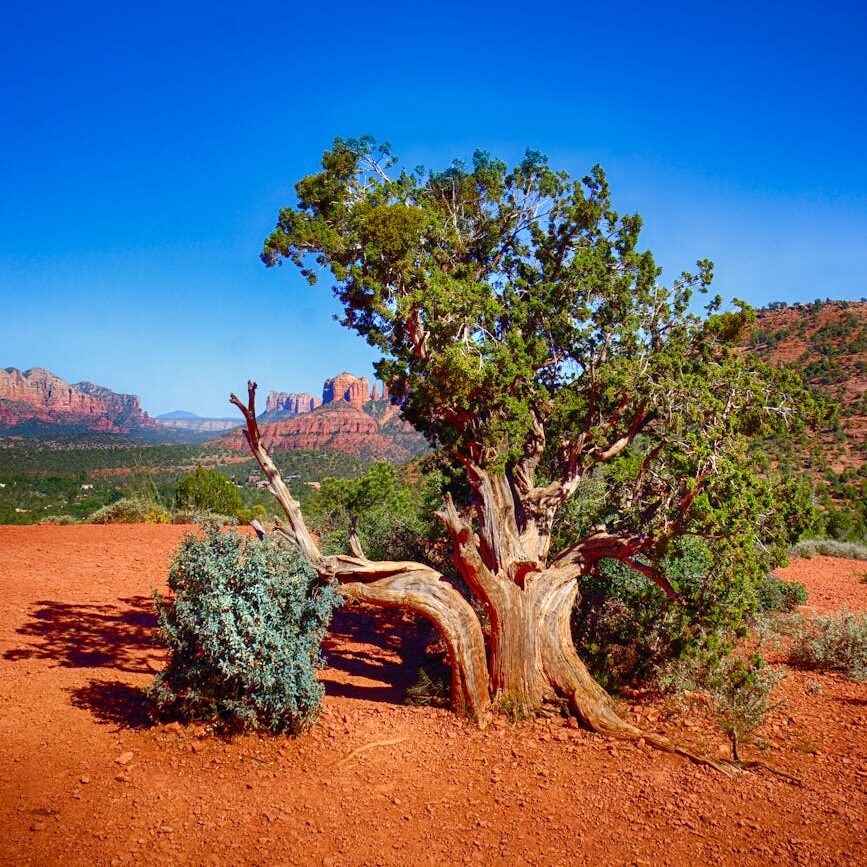
One such weird, fascinating plant is the Utah Juniper Tree. 

A juniper tree at “Hell’s Half Acre” near Blackfoot, Idaho.

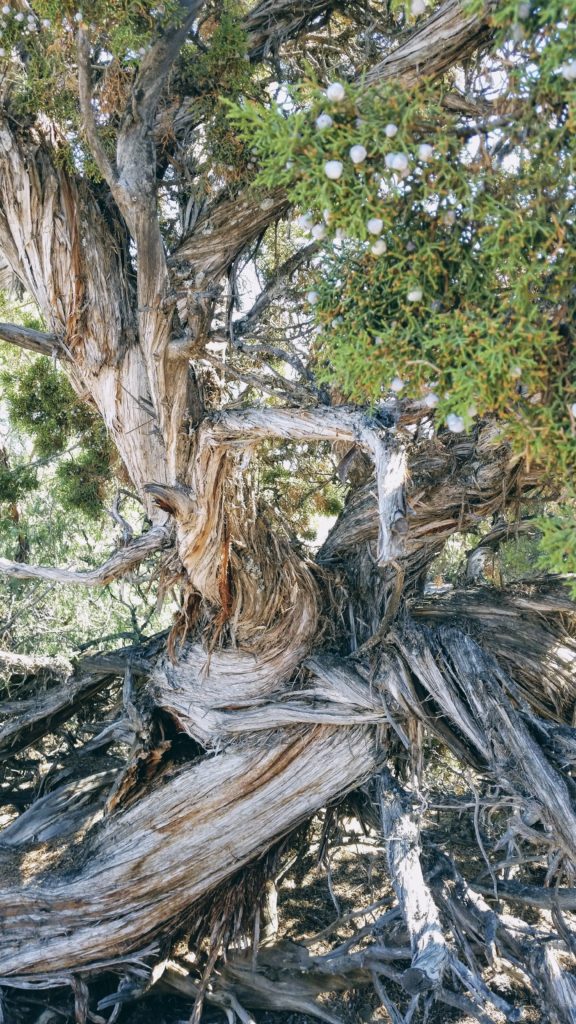
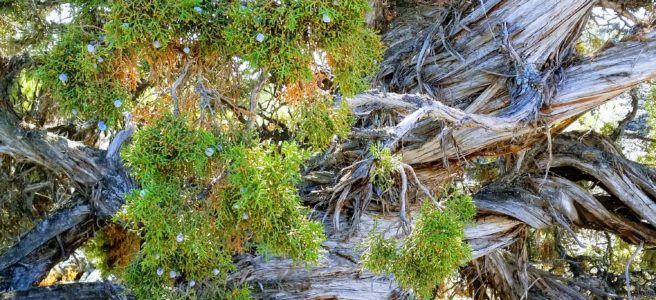
When I lived in Southeast Idaho, I spent a lot of time driving between there and everywhere else, including Utah and California. Near Blackfoot, Idaho, there is a large volcanic scar that runs along the highway for a time. I love the look of the green or brown (depending on the season) grass and other plants against the black rock. But I was always fascinated by the gnarled trees that jut out at odd angles straight from the rock, even on cliff faces. I wondered how the trees survive. I couldn’t see any kind of soil. There’s a rest stop that has some walking trails and I stopped once to check it out and discovered the trees are Utah Junipers. They are native throughout Southern Idaho, Colorado, Northern Idaho and some parts of Southern California–but mostly found in Utah. (slide change)

They’re the trees of the high desert.

Not much can survive the arid, harsh conditions of the high desert–yet, here, the Utah Juniper thrives. It grows slowly, so slowly. A tree can be hundreds of years old, but less than 25 feet tall. But its height, or lack thereof, is not what makes it interesting to me. 

The wind whips and whirls almost constantly along the rocky, dry earth, shaping the juniper trees into gnarled, twisted, and distinctive formations. Yet, the perpetually blowing wind of the Western Desert does not destroy the tree. It hardens it, weathers it, and shapes it.  The experiences of the Utah Juniper’s life make it unique, beautiful, and strong. 

a juniper tree at the grand canyon
Photo by Landon Parenteau on Pexels.com

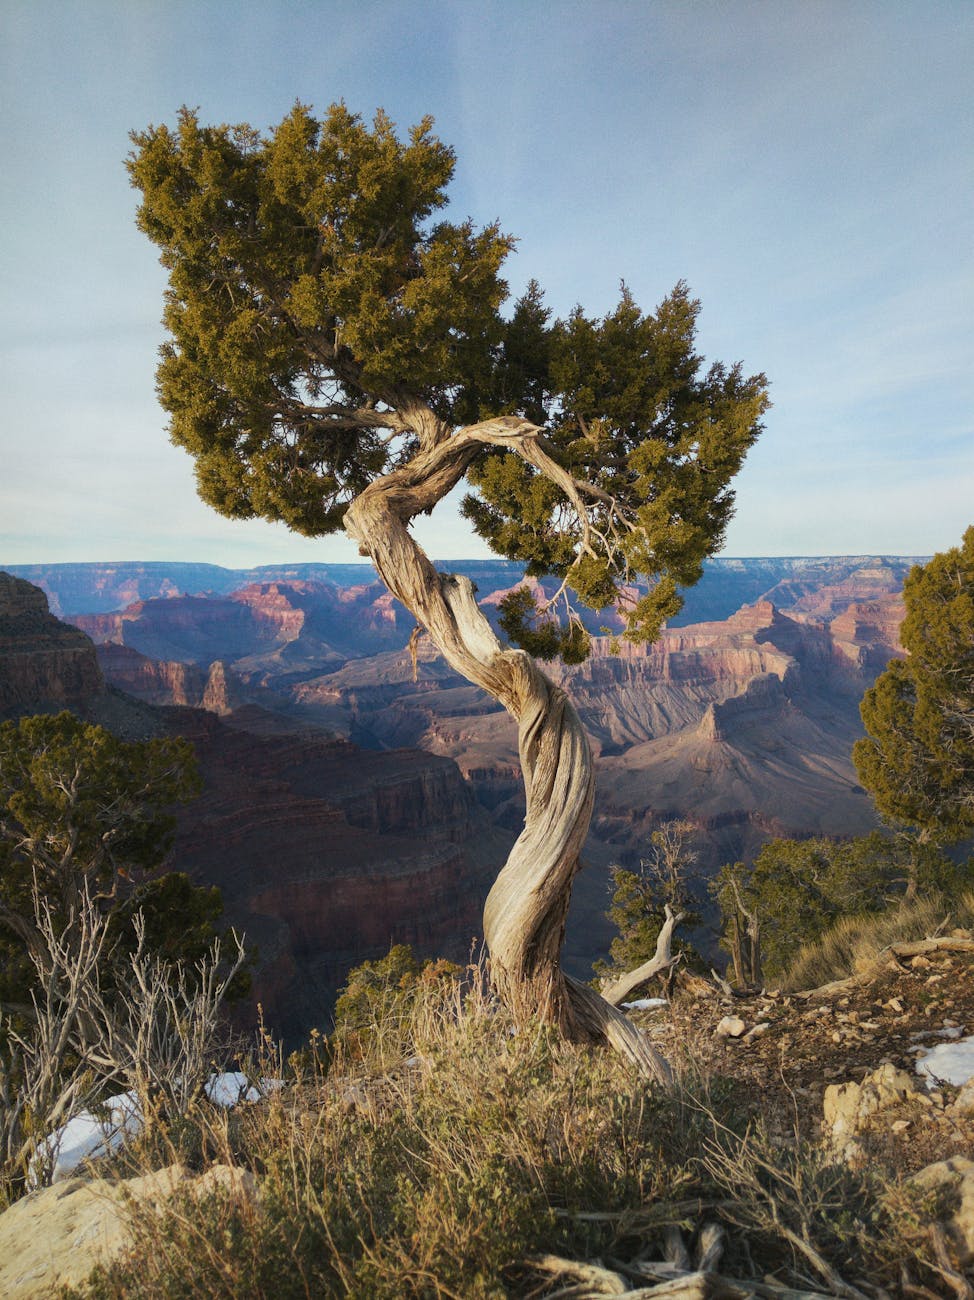
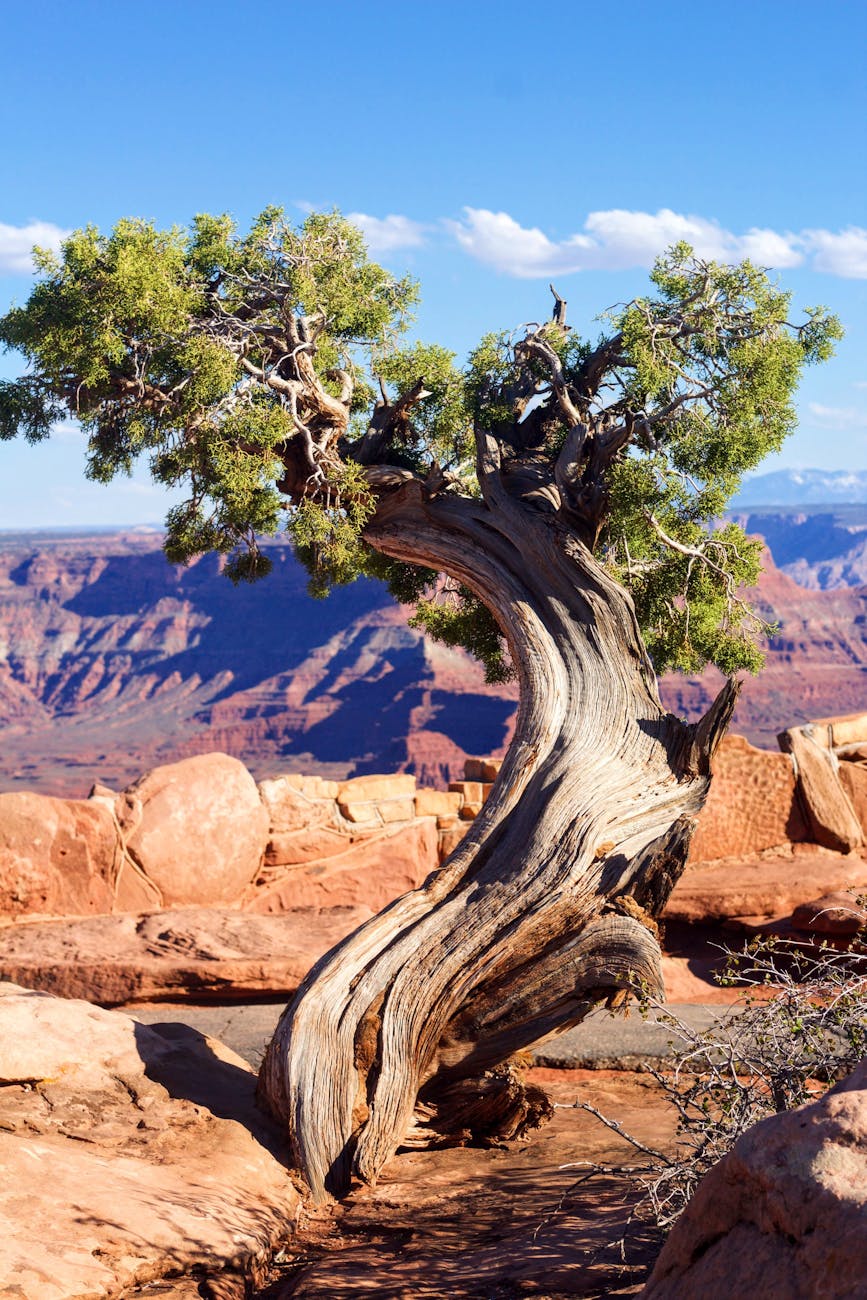
Life in the high desert is not easy for plants. Such arid conditions leave the rocky surface riddled with dead, dried grasses–remnants of a spring thaw long past. Most plants burn up and wither away within one season. And yet, here lies the Juniper tree surviving–thriving even–slowly building itself up year after year, inch after inch, to reach its full potential sometimes for 750 years or longer. Giving itself the grace to grow whatever it can grow, however it can grow, with the resources it has. 

Its roots grow stronger and deeper each year as it finds nourishment in the rocky ground in which it grows. A tree may be 15 feet tall, but the main tap roots can be 40 feet deep into the rock, with lateral roots growing out 100 feet away from the tree. The root system often accounts for 2/3 of the total tree mass. Because the roots are so hardy, even when the wind knocks the tree over, it will continue to grow. No matter the intensity of the burdens of the weather, it continues to cling to the sides of mountains, to cliffs, to life, and keeps growing. They are patient in their perseverance.

green tree
Photo by Shahid Tanweer on Pexels.com

The tree also sustains life around it, providing food and shelter for birds and small animals. It takes the harshness of the environment and turns it into something life-giving for all those around it.

These fascinating trees and their determination to cling to life make me feel so hopeful.  

In a 2019 BYU Women’s Conference talk, Sister Becky Craven said, 

“Hope in a gospel sense is hope in Christ. And hope in Christ simply means that we trust Him and we trust in our Heavenly Father’s plan.”

“Therefore, hope is expectation, even anticipation for happiness not only in the hereafter, but an expectation that we can have joy and contentment right now, regardless of our circumstances.”

She continued, “Waiting can mean being stifled, biding one’s time, or stopping. “But to ‘wait upon the Lord’ is not biding one’s time. It is being patient while moving forward with confidence, faith, and trust in the Lord’s plan for us.”

The Lord, at times, gives personalized and tailor-made challenges designed to help His children grow.”

green tree near mountain
Photo by Robert Anthony Carbone on Pexels.com

In October 2008, Elder Dieter F. Uchtdorf gave a really beautiful talk about Hope. I’ve pulled a few quotes out: 

“Hope, on the other hand, is like the beam of sunlight rising up and above the horizon of our present circumstances. It pierces the darkness with a brilliant dawn. It encourages and inspires us to place our trust in the loving care of an eternal Heavenly Father, who has prepared a way for those who seek for eternal truth in a world of relativism, confusion, and of fear….

Hope is not knowledge,17 but rather the abiding trust that the Lord will fulfill His promise to us. It is confidence that if we live according to God’s laws and the words of His prophets now, we will receive desired blessings in the future.18 It is believing and expecting that our prayers will be answered. It is manifest in confidence, optimism, enthusiasm, and patient perseverance.”

The things we hope for are often future events. … No matter how bleak the chapter of our lives may look today, because of the life and sacrifice of Jesus Christ, we may hope and be assured that the ending of the book of our lives will exceed our grandest expectations. …

The things we hope in sustain us during our daily walk. They uphold us through trials, temptations, and sorrow. Everyone has experienced discouragement and difficulty. Indeed, there are times when the darkness may seem unbearable. It is in these times that the divine principles of the restored gospel we hope in can uphold us and carry us until, once again, we walk in the light.

We hope in Jesus the Christ, in the goodness of God, in the manifestations of the Holy Spirit, in the knowledge that prayers are heard and answered. Because God has been faithful and kept His promises in the past, we can hope with confidence that God will keep His promises to us in the present and in the future…

The things we hope for lead us to faith, while the things we hope in lead us to charity. The three qualities—faith, hope, and charity35—working together, grounded on the truth and light of the restored gospel of Jesus Christ, lead us to abound in good works.36

With Nephi I declare: “Press forward with a steadfastness in Christ, having a perfect brightness of hope, and a love of God and of all men. Wherefore, if ye shall press forward, feasting upon the word of Christ, and endure to the end, behold, thus saith the Father: Ye shall have eternal life.”39


green leafed tree
Photo by Jen Healy on Pexels.com

If the trees were sentient, they may wish they didn’t live in such a windy and severe climate. But then they wouldn’t have such an interesting and unique look. The wood would not be hardened and useful to the people who lived in these locations for centuries, who used it as firewood and fencing. They wouldn’t be able to give shelter, nutrients and protection for the surrounding area for centuries.

May we not be like the single-season grasses but rather the Juniper tree that sends its roots out deep and wide and provides shelter and nourishment to those all around it. May we find peace and hope we continue to persevere through winds that beat at us and dig as deep as we need through the dry desert sands at our feet to the eternal well of the Savior’s Atoning Waters.

Handcrafting an Elegant Orchid and Rose Fascinator Hat DIY

This might be my favorite project I’ve made to date. I saw an incredible flower headpiece photo online and knew I wanted to make something inspired by it for an office St. Patrick’s Day lunch. We were supposed to wear our most outrageous outfits. I wasn’t feeling outrageous, but I was feeling big—as in a big hat. Haha.

Making the Hat Base

I had made a small fascinator a few years ago. It’s a small, cute pink and white one. But this needed to be big. Statement making. Over the top, perhaps? lol. I wanted it to angle over my eye and go up in the back. So I needed to figure out how to make that happen. I found some tutorials online and realized that I needed fabric stiffener. I drew up a rounded diamond-ish shape I liked and then soaked it in stiffener, shaped it, and left it overnight to dry. Surprisingly it worked! I then added a “loop” underneath so a headband can slip through and hold the hat in place. It mostly worked. It ended up being a little heavy for the style of headband I wore.

The Orchid and Rose Fascinator DIY
Rigging up a solution to shape the felt base the way I wanted while the stiffener dried. It worked!
Woman wearing glasses wears a shaped piece of felt on her head. It's the base of a hat.
Shaping the hat worked!

Creating the Flowers

Then I got to work on flowers. I loved the huge orchids on the inspo photo so I made three big ones, with some flower buds up at the top so it looked more like a branch. I used the branch as the basic armature of the hat. There needed to be some accent flowers. Since this was for a St. Patrick’s Day party, I went with seven gold roses.

Paper Orchid branch and roses.
The paper orchid branch and roses are ready to be added to the hat base. I ended up making another small rose to tuck into an empty spot.

The full-sized orchids are about six inches across—they are big! The biggest rose is about five inches and gets progressively smaller.

White Orchids and Gold roses sit on a mannequin head.
Testing out rose placement.
A headband holds the hat on the head for this orchid and rose fascinator diy.
Here, you can see how the headband slips through a “loop” underneath the hat base.

Making the Leaves

Once I had the roses added, I knew I needed some greenery. Maybe lots of greenery?

Green crepe has a bad habit of fading and bleaching out in the sun, so I was hesitant to use it for this project, because I wanted it to have longevity. There are sprays that can be used to help with color fixing, but they are not permanent. One way to help combat this is to paint or dye your own crepe. I chose to do this for my green. I’ve painted green crepe for my rose leaves before. This time, I wanted to try dyeing white crepe green. I picked up acrylic ink in a variety of blues, yellows, and greens (even a silvery green, which gave the leaves a cool, subtle shimmer). If you are looking for these paints, I suggest looking at Michaels and when they are on sale or if you have a coupon.

I decided on a leaf shape roughly similar to a blue gum eucalyptus (my favorite!) and cut my white crepe paper into strips that would be that leaf length. I mixed the paint with water and put the paper strips in to absorb the color. Then, I went back over the paper with additional drops of paint as it was drying but still damp to get more color variation. I LOVE HOW IT TURNED OUT. I will definitely be doing this method again. The color was amazing.

Green strips of paper drying on a metal tray.
Drying dyed paper on cookie sheets. These will become the leaves.
paper leaves of various shades of green lay scattered on a white background
I love how the variegation turned out on the leaves!

Adding the Greenery

Green leaves added to orchid and rose hat diy.
Leaves added to the back of the hat.

I glued the leaves individually to the armature so I could place and shape them where I wanted. The nice thing about having wired leaves (and petals, if the flower calls for it) is that you can shape the leaf and have it go wherever you like. It was fun to have the leaves curl, bend, and weave throughout this project.

I needed “ground cover” in a blank spot in the back, so since it was St. Patrick’s Day, I added tons of little clovers. I used the template I put together from my redwood sorrel (which isn’t related). There is a four-leaf clover in the clover patch. It’s hiding in the back a little, towards the bottom (not really visible in the photo below).

Clovers in the back of the Orchid and Rose Fascinator diy
Clovers having their moment in the back of my orchid hat. I added a little bling and sparkle to give it my “extra” signature. haha.

Finishing Touches

Next were the finishing touches. Adding the leaves, the green wire loops I’d made, and feathers I’d picked up at a local craft store.

testing wire loops for the hat.
Testing out the placement of the wire loops and feathers I made.

The wire loops were 20 gauge wire wrapped in green crepe paper. I made 15 lengths and grouped them into five groups of three. Then, I wove them in and out of the flowers and leaves.

I found an ostrich feather “branch” at a craft store and loved it so much I just had to incorporate it. There are two sections at the top and one at the bottom. With these added, the hat is 24 inches long! I did make them removable. lol.

It needed something else. Some pièce de résistance. I had already added a touch of glitter in the back and didn’t want to add more. But gold leaf? YES. I added patches of it in random spots all over. I loved how it turned out.

  • Gold leaf added randomly to the leaves and petals.
  • Orchid and Rose Fascinator

Finale

If you’ve made it this far, bravo! Let’s see how it turned out!

  • Orchid and Rose Fascinator
  • Finished Orchid and Rose Fascinator DIY
  • Orchid and Rose Fascinator
  • Orchid and Rose Fascinator

After it was a hit at the party (if I do say so myself, lol), I needed a way to store it safely. I found a large frame at a thrift store and thought it was perfect for mounting the fascinator. I refinished the gold with some rub ‘n’ buff. Then, I mounted the hat on cardstock. I used zip ties to attach it to the frame so I could clip it out if I wanted to use the hat again. I’m pretty proud of how professional it ended up looking!

  • Mounted and framed Orchid and Rose Fascinator
  • Mounted and framed Orchid and Rose Fascinator
  • Mounted and framed Orchid and Rose Fascinator
  • Mounted and framed Orchid and Rose Fascinator
  • Mounted and framed Orchid and Rose Fascinator
  • Mounted and framed Orchid and Rose Fascinator
  • Mounted and framed Orchid and Rose Fascinator

To wrap up this post, I entered it at the State Fair this year and got a First Place Ribbon!

Mounted fascinator with a blue first prize ribbon attached.

Thanks for reading!

xoxo!

The Hidden Curse: The Illusion of ‘Normal’ Lab Results

woman wearing a white lab coat looking into a microscope

Endless Pokes

I got normal lab results again recently. It was just a CBC with differential. Nothing big. But still another poke. I’m used to labs by now. I can tell the phlebotomist exactly where to poke me for the best access (the back of my hands, towards the outside). “And when it likely fails, don’t worry, new friend, it’s me, not you,” I say every time. They inevitably laugh and say they’ll be able to get it because the vein looks excellent. Their naivety is adorable. I smile tightly. “Yep. it sure does.” And sigh on the inside. I have terrible veins that don’t like to cooperate. Drawing blood is much easier than setting an IV, though. IVs often take multiple attempts and multiple nurses. This time, I was lucky, and the phlebotomist got me on the first poke. I still have a nice hematoma, though. 

The results came back the next day. I am the picture of health according to them. 

Ha. Ha haha hahahahahahahahaha. Excuse me while I try not to have an asthma attack from laughing so hard. 

Clearly, I am not. 

But yet, that is what my labs almost always say—normal results. All my tested biomarker levels are in healthy ranges. Well, that’s just great. I’m glad they are. Really, I am. It means my medication isn’t damaging my organs (yet), and my immune system is managing to be okay. But that doesn’t help us measure what is happening in my body. 

The labs, of course, provided no real answers—except what was not wrong with me. This is helpful to an extent—don’t get me wrong—but ruling things out is almost as helpful—but they are not the actual answers. 

Labs

The problem with my condition is that very few labs can actually measure what is going on. And those few labs are notoriously tricky to do. The chemicals measured are extraordinarily fickle and break down very quickly. Sample collection requires collecting urine in a particular container for 24 hours and keeping it chilled the entire time. The samples have to be constantly refrigerated, even during transportation. Even 5 minutes outside of a cooler can ruin the 24 hours of work (and it is work!). There’s a bit of art in keeping the samples chilled. Patient groups frequently pass these tips on to the “newbies.” 

Few laboratories are equipped to perform the labs, and fewer are knowledgeable enough to keep everything adequately chilled. The margin for error for these tests is massive, and they are unreliable. A negative result doesn’t rule out anything. It probably means someone messed up the test. Even when everything is supposedly done properly, results can be inconclusive or normal. It’s incredibly frustrating—all that work and expense for naught. Many patients try these labs repeatedly, trying to get the elusive positive result. 

Woman wearing a white lab coat looking into a microscope
Photo by Trust “Tru” Katsande on Unsplash

Testing 

When I was first diagnosed in 2015, I had more labs that came back unhelpful. I did everything right, but I still didn’t get ideal lab results that conclusively proved my diagnosis. Fortunately, my doctor felt (and others have since agreed) that the labs and my symptoms were enough to give me my diagnosis. I am so, so grateful. Not every patient is so lucky.

When I got sick at age 14, I learned the anguish of labs that don’t provide answers. I remember one phlebotomy session where 18 large vials of blood were taken. Then, I had a bleeding time test. They were trying to figure out if I had a clotting disorder, among many other things, I’m sure. I remember thinking that it was ironic they were taking so much blood when we had just had a conversation with the doctor about whether I needed a blood transfusion because of how little blood I had. I do have a blood disorder–they were right about that, but the fickle labs for it wouldn’t be invented for another 10+ years. My condition wouldn’t even have a name for another 10 years. It was impossible to find then.

Countless labs have followed in the years since. More normal or inconclusive lab results. Maybe this time will be when my body finally objectively proves something is wrong? No, not this time.

But I am sick! I yell at the screen of normal numbers. Why won’t you show that!? Something is wrong. Please show the doctors I am not making this up! Please tell them I am not crazy! For once. just tell us something helpful. Please! 

Objective vs. Subjective Findings

Doctors like to have something to show them what’s wrong, something to justify the symptoms. They like to measure and count, which allows them to mark improvement or digression. When labs don’t support the patient’s symptoms, doctors are asked to rely on subjective findings. Subjective findings are the bane of our lives. Don’t even get me started on the pain scale. 

One specialist and I spent months experimenting, testing, endoscopies, and biopsies, trying to find a good marker for me so we could see if any treatments were helping. All we ended up doing was almost killing me when we found out I was super allergic to the multiple feeding tube formulas I was briefly on. That was SUPER helpful to know, so I count the whole thing as a win (no other circumstances would have given us the allergy info). But my doctor still, years later, feels horrible about making me so sick–and that it still didn’t even give us an accurate, objective way to measure anything objectively on me. 

I’ve had doctors that won’t give weight to subjective findings. If there’s nothing clinically wrong, then there’s nothing subjectively wrong–the patient is either making them up or exaggerating them. I worry that the ordering doctor will review the results whenever I get a normal lab result and say, “Ah, just as I thought. Megan, you’re fine. You’re just malingering. You need to lose weight and exercise. Here’s a psych referral.” Or they might even note in my chart the terrifying label of “Munchausen’s.” I think this is something most, if not all, patients with invisible diseases are terrified of. Especially those with the really invisible diseases–the conditions invisible to even lab tests. 

Doing My Part in the Process

Fortunately (?) I do have a few physical symptoms. Anaphylaxis is obviously a clear, objective finding. But even my hives are mostly invisible! How the heck am I supposed to show doctors I have hives when they are under my skin? Before I had my significant symptoms, I had years of a lot of little problems with very few supporting clinical findings. 

I’m so incredibly blessed to have doctors who believe me. They keep looking and running test after test, trying to find something they can measure. And when we don’t see anything, they still listen, and they still believe me and my symptoms and still keep treating me. I’ve worked hard to be a trustworthy patient, so what I describe is accurate and not exaggerated. I keep notes and journal my health so I can be a reliable witness to the failings of my body. I work hard to be an active and educated participant in my health journey. If I am not, who else will be?

I know how often doctors cannot trust patients. As Dr. House so often said, “Patients lie.” I earnestly seek to be the patient who does not. 

How else will the doctors believe me when it’s my labs that are the ones lying?